Showing posts with label Cooking. Show all posts

Sunday, May 5, 2013

Taco Seasoning

My German roots are showing.  I didn't even realize it was Cinco de Mayo until the pastor mentioned a Mexican-themed meeting after church.  That's not a problem, though, since my dinner plans weren't set in stone yet anyway.  We gathered up a few ingredients, and some store-bought tortilla chips, and pulled together some heaping nachos.

But I didn't want to pull together a mini-party without sharing a recipe with my on-line readers.  So here's my homemade version of taco seasoning.

I enjoy making my own seasoning blends, so that I can spend my limited grocery budget more frugally.  I also like to be confident that my seasonings are 100% guaranteed to be MSG-free.  I buy the individual seasonings in bulk, then blend them together and store them to quickly toss into a meal.

Taco Seasoning
  • 1/2 cup ground cumin
  • 1/4 cup paprika
  • 3/8 cup oregano
  • 3/8 cup garlic powder
  • 3/8 cup cornstarch
  • 1/8 cup salt 
  • 1/8 cup cayenne pepper
  • 1 Tablespoon onion powder
Mix, and store in an airtight jar. 

When I make tacos I like to brown the beef and set it aside.  Then I saute an onion.  Finally, I return the meat and add 2/3 cup to 3/4 cup water (per pound of meat) and 1/8 cup of the seasoning blend per pound of meat.  (Important: don't add all of the above to a pound of meat.  You'll be a little overwhelmed.  Trust me on this.)

You may be wondering why this recipe doesn't include chili powder.  Almost every on-line recipe includes a line for chili powder.  Is it possible that I left something out? 

Actually all of the ingredients in chili powder are repeated in taco seasoning, so it didn't make sense to me to buy a separate mix just to add them in again.  Instead, I add the chili powder ingredients to the original recipe just to simplify life a little bit.

If you don't want to store any leftover taco seasoning, you can just add the following to one pound of meat, along with 2/3-3/4 cup of water.

Taco Seasoning for One Meal

  • 2 Tablespoons + 2 teaspoons ground cumin
  • 1 Tablespoons + 1 teaspoon paprika
  • 1 Tablespoon oregano
  • 1 Tablespoon garlic powder
  • 1 Tablespoon cornstarch
  • 2 teaspoons salt
  • 2 teaspoons cayenne pepper
  • 1 teaspoon onion powder
My inspirations:
http://southernfood.about.com/od/seasoningrecipes/r/bl30420j.htm
http://allrecipes.com/recipe/taco-seasoning/detail.aspx
http://www.grouprecipes.com/5616/best-ever-taco-seasoning-mix.html

Linked with Whole Foods WednesdayReal Food Wednesday, Simple Lives Thursday and Thank Your Body Thursday.

Sunday, March 17, 2013

Pickling Spice for Your St. Patrick's Day Corned Beef

I freely confess that I'm neither a Roman Catholic nor Irish.  With that in mind, there is no shame that St. Patrick's Day caught me off-guard once again.  It's not one of those high holy days that I plan for weeks and months in advance.  I used to catch St. Patty's day by watching the grocery store circulars, but now that I buy so many of my groceries either straight from the farm or through organic boxes I frequently miss minor holidays now (and thank heavens that nobody pinches anyone for not wearing green on St Patrick's Day in my homeschool).  It was the weather channel's website that clued me in this year, since they had a special forecast section just for St. Patrick's Day weather.

So my dear husband made a St. Patrick's Day run to the grocery store last night.  I freely confess that the corned beef he picked up wasn't the normal quality of meat that we eat, but nonetheless we bought it anyway.  But filling the crock pot this morning left us with a conundrum.  What about that little seasoning packet that comes along with the meat?  I have very little faith in the processed & packaged food industry and avoid monosodium glutamate, yeast extract, and all of it's other derivatives like the plague.  So what's a mother to do?

We decided to add our own pickling mix to the cheap (and probably toxic) meat that we're cooking up today.  The recipe below makes up just a tiny amount of seasonings, so feel free to scale it up if you're wanting to prepare for more than just a single serving size.

I wasn't fortunate enough to have a time-honored pickling spice recipe handed down in the family, so when I originally went about looking for the perfect spice blend for our family I started by googling at least three recipes.  I started with Simply Canning, Amazing Ribs, and NPR, but it was A Way to Garden that really educated me on how pickling spice worked. 

Corning the Beef

Cuts of meat labeled "corned beef" are brined and fermented in advance.  A better choice (although we passed it up this year) would be to purchase a well-marbled beef brisket or other tough roast.  Rinse the meat and cut it into 2 to 3 inch chunks.  Dissolve 5/8 cup sea salt (not optional) and 1 tablespoon maple syrup or sucanat or Rapadura organic whole cane sugar in a quart of water.  (If you do not plan on using your meat within 10 days add 1-1/4 teaspoons of curing salt.  This contains sodium nitrite which will preserve the meat for longer.  Freeze after curing is complete.)  Pack the meat in a 2-Liter Pickl-It jar.  Cover with brine.  Hold the meat down with a Dunk'R.  Put the airlock on the jar.  Cover the jar with a dish towel or place it in a dark cabinet for 8 hours.  Refrigerate for 7 to 10 days, checking the brine level daily to ensure that the meat stays covered.
Adapted from: The Complete Idiot's Guide to Fermenting Food


When it's time to cook the beef, I add the following vegetables:
  • 1 onion, quartered
  • 6 cloves garlic
Then I mix in the following seasonings for every 5 pounds of corned beef:

Pickling Spice

  • 2 teaspoons ground ginger
  • 2 teaspoons mustard seed
  • 2 teaspoons coriander seed
  • 2 teaspoons whole allspice
  • 1 teaspoon black peppercorns
  • 4 whole cloves
  • 2 bay leaves, crumbled
  • 2" cinnamon stick, crushed or broken into pieces
This pickling spice can be adapted for pickles, as well as for corned beef.  I like to lower the ginger down to 1 teaspoon and add an additional 2 teaspoons of dill seed or dill weed when making pickles.

Enjoy!

Monday, June 25, 2012

Lactofermented Garlic Paste

I hate procrastination.  Especially when I'm the guilty party.

I've been wanting to post this recipe for just shy of a year, but it hasn't happened.  (I realize that I haven't been blogging for a year, but there were months of planning that went into this before I began.)  It really isn't my fault, entirely.  I have more ideas than I have time to put into practice, and I don't want to become overwhelmed trying to be everything for everybody.

Enough chasing of rabbits.  This is a recipe that's near and dear to my heart, because I associate it with special occasions, like my anniversary.  It's a part of my Indian feast.  But because I make it only for special occasions, as part of a larger feast, I don't have many opportunities to take pictures.

Now that someone is asking for my naan recipe, however, I've decided to post at least a portion of my Indian feast now and come back in a few weeks (after my anniversary, of course) to add photos.
 
Garlic Sauce
1-2 cold egg whites
4-6 cloves garlic, minced
1/4 teaspoon salt, not optional
1/4 cup lemon juice
1 cup grapeseed or olive oil
1 Tablespoon living whey

Before we really get started on the recipe, let's pause for a minute and consider the ingredients.  Use a salt that is colored.  Salt is white when it comes from the lab.  In nature it has many colors, from reds and pinks to grays and blacks.  By choosing a salt that is colored, you can be sure that you are buying an unprocessed salt.  Don't be fooled (as I was) by a label like, "sea salt."  Almost all salt is from the sea, but that doesn't mean that the minerals weren't stripped.

Your whey needs to be alive.  Do not use powdered whey.  It is highly processed and will not be useful in this recipe.  Do not use whey which has been heated.  After a certain temperature the beneficial bacteria dies.  Instead use whey from making yogurt, unheated cheese, or (my personal favorite) dairy kefir.

If you do not have whey, you could just substitute another living starter culture, such as unpasteurized kombucha, water kefir, Body ecology starter culture, yogurt, or unpasteurized buttermilk.  However, all of these options will influence your final taste.  The whey or other starter culture is important, because it gives plenty of beneficial bacteria to overwhelm any nasties that might come along with the raw egg.

Theoretically, you could also add an extra tablespoon of salt and see what wild bacteria you can grow.  However, since most chicken (even backyard flocks) contains salmonella or campylobacter, I wouldn't do that without pasteurizing the eggs first.  I know that plenty of people don't bother pasteurizing pastured eggs since they are less likely to contain harmful bacteria, but it still is a little like playing Russian roulette--even though your odds of winning are better.

Also, don't forget the salt.

Note: my recipe is for those who own a Vitamix.  It can be adapted to any blender or can be made with a simple wire whisk, but I do not have experience doing it that way.

All ingredients must be at room temperature, except that the egg whites must be cold.  Place the egg white, garlic, salt, and lemon juice in Vitamix.  Select variable 1.  Turn the machine on, quickly move it to variable 10, and then to High.  While the machine is running, remove the liquid plug and pour the oil in a thin, steady stream until the mixture thickens and all oil is consumed (about 60 seconds).  Stop the machine.  Feel the outside of the machine.  If it is too hot to touch, then it needs to cool down to a more comfortable temperature.  (Don't be impatient or you'll kill off the beneficial bacteria that you're trying to culture).  When it is cool enough, stir in the whey and any remaining oil.  Leave it out in an air-tight container at room temperature for 7 hours, and then refrigerate.

Acknowledgements:
I rarely just use a recipe without tinkering with it.  That's not how God wired me.  These are the recipes that inspired me, the ones I cobbled together into what you see above. http://www.dedemed.com/mediterranean/garlic-sauce-recipe
http://www.vitamix.com/recipes/
http://gnowfglins.com/ecourse/real-food-menus

Sourdough Garlic Naan

Ever have one of those things that you plan on doing, but because of one small detail it doesn't get done?  This post is like that.

I've wanted to post this recipe for a long time.  It's a recipe that's near and dear to my heart because I reserve it for special occasions, like my anniversary.  It's a part of my Indian feast.  But because I make it only for special occasions, as part of a larger feast, I don't have many opportunities to take pictures.

Now that someone is asking for my naan recipe, however, I've decided to post it sans photos and come back in a few weeks (after my anniversary, of course) to update it.

Sourdough Garlic Naan
1 cup sourdough starter
3/4 cup living whey
1 teaspoon baking powder
1/4 teaspoon salt
1/2 teaspoon cumin
3 Tablespoons melted lard, coconut oil, or butter
2 Teaspoons garlic paste
approximately 2 cups flour
water
butter

Before we really get started on the recipe, let's pause for a minute and consider the ingredients.  Your sourdough starter does not have to be at the peak of its activity.  Heck, it doesn't even need to be fed, for that matter.  If you have a some-what active starter and are considering discarding 1 cup during a feeding, you might want to consider making naan with the discarded starter.

Your whey needs to be alive.  Do not use powdered whey.  It is highly processed and will not be useful in this recipe.  Do not use whey which has been heated.  After a certain temperature the beneficial bacteria dies.  Instead use whey from making yogurt, unheated cheese, or (my personal favorite) dairy kefir.  If you do not have whey just substitute milk.

Use a salt that is colored.  Salt is white when it comes from the lab.  In nature it has many colors, from reds and pinks to grays and blacks.  By choosing a salt that is colored, you can be sure that you are buying an unprocessed salt.  Don't be fooled (as I was) by a label like, "sea salt."  Almost all salt is from the sea, but that doesn't mean that the minerals weren't stripped.

Finally, do give lard a chance.  It makes the best breads, believe it or not.  If you don't have access to a good lard, coconut oil and butter make excellent choices, as well.

Mix sourdough starter, whey, baking powder, salt, cumin, garlic, and lard.  Slowly add the flour.  Depending on your flour and the moisture of your sourdough starter, you may need more or less than the two cups.  Adding too much flour will result in a dry, crumbly mess.  Not enough flour with yield a sticky mess that is impossible to roll out.  Find your happy medium.  Use your hands to mix the dough so you can get a feel of where you are at.  Cover with a towel, and let rest 2-3 hours until it rises slightly.  

Transfer to a lightly floured surface.  I had been told that amateurs add too much flour and end up with soured bricks, so I was afraid to flour my surface.  After making the recipe repeatedly I discovered that .the high humidity in my area calls for extra flour.  Now I'm not afraid to do what works for me.  

Knead for a minute or two until smooth, adding only enough flour to keep it from sticking to your hands.  

Preheat a heavy skillet (let's hear it for cast iron!) over medium-high heat.  Divide the dough into 8 balls.  Roll the dough with a rolling pin or flatten with the hands to 1/4 inch thick rounds (or oblongs).  Brush with water on one side and place water-side-down in skillet.  It will stick.  Cook for 30 seconds to one minute, until the dough is bubbling and it no longer sticks.  For those cooking on electric, flip and cook the other side.  For those cooking on gas, begin the next piece in the skillet and take the original piece to another burner, light it and cook over an open flame.  (A totally cool experience that should not be passed up!)  Hold it with kitchen or barbecue tongs and keep it moving constantly for 30 seconds or until charred.  

Top with melted butter.

Acknowledgements:
I rarely just use a recipe.  That's not how God wired me.  Instead I mess with a recipe until I can get it to submit to my will.  These are the recipes that inspired me, the ones I cobbled together into what you see above.
http://www.mykitchenaddiction.com/2011/04/sourdough-naan/
http://www.vahrehvah.com/recipedetails.php?recipe_id=2856&name=Garlic+Naan+
http://www.theprairiehomestead.com/2011/07/whole-wheat-sourdough-tortillas.html

Linked with Fat Tuesday, Monday ManiaTraditional TuesdaysReal Food Wednesdays, and Healthy 2Day Wednesdays

Sunday, February 12, 2012

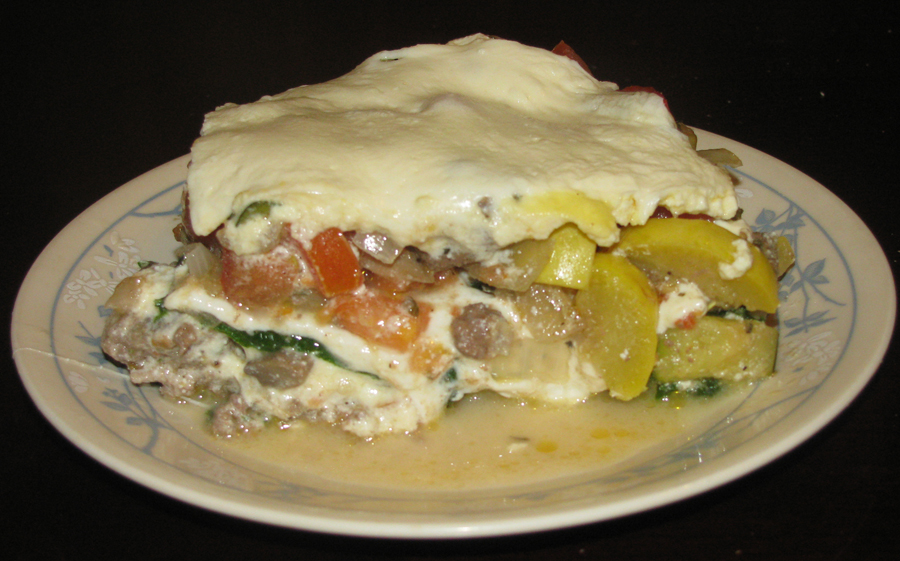
Grain-Free Lasagna

This recipe was designed in honor of my six-year-old, who missed some familiar favorites when we started our season of eating sugar-free/grain-free.   It includes enough kale, sulphur-rich vegetables, and bright colors to satisfy Dr Terry Wahl, although it would need a little modification (It contains soft cheeses and eggs) to be Paleo or GAPS friendly.

Grain-Free Lasagna
  • kale
  • 2 medium zucchini or yellow squash, quartered and slice
  • 1/4 c butter
  • 4 ounces sliced mushrooms
  • 1 medium onion, sliced
  • 2 cloves garlic, minced
  • 1 pound ground beef
  • 3/4 teaspoon fennel
  • 3/4 teaspoon black pepper
  • 2 teaspoons basil
  • 2 teaspoons oregano
  • 4 medium tomatoes, chopped (with juices retained)
  • 15 ounces ricotta cheese
  • 1/4 c Parmesan
  • 3 eggs, beaten
  • 1 pound log of mozzarella, sliced length-wise
Preheat oven to 350 degrees Fahrenheit.

Select enough kale to cover a 9" x 13" baking dish twice over.  For me, that's about 10 leaves, but there are large variations in the size of kale leaves.  Remove the large center stalk and discard or compost.  (Don't put it into the stock pot.)  Cover with boiling water and cook until softened, ranging from 5 to 20 minutes depending on preferences.  Drain without retaining the cooking water, and set aside.

Meanwhile saute the squash, mushrooms, onion, and garlic in butter for about 5 minutes.  Add ground beef and cook for 10 minutes or until done, stirring occasionally.  Drain.  (We usually retain all of that good fat for use on our eggs at breakfast the next day.)  Add seasonings and tomatoes.  Simmer, uncovered, until flavors have blended.

Mix cheeses and eggs until well-blended.

Layer half of the kale, 1/3 of the mozzarella, half of the meat sauce, and half of the ricotta sauce.  Repeat layers.  Top with the remaining mozzarella.

Bake 30 to 35 minutes, until heated through.  Serves 4 adults

Inspiration from Kraft recipes and Hunts.  Linked to Sunday School at Butter Believer, Monday Mania at The Healthy Home Economist, Fat Tuesday at Real Food Forager, Traditional Tuesdays at Cooking Traditional Foods, Real Food Wednesdays at Kelly the Kitchen Kop, Healthy 2Day Wednesdays at Day2Day Joys, Whole Food Wednesdays on Beyond the Peel, Pennywise Platter Thursday at Nourishing Gourmet, Full Plate Thursday at Miz Helen's Country Cottage, Living Well at Common Sense Homesteading, Freaky Friday at Real Food Freaks, Friday Favorites at Simply Sweet Home, Fight Back Fridays at Food Renegade, Friday Food Flicks at Traditional Foods, and Simple Lives Thursday at Gnowfglins.

Friday, December 16, 2011

Lactofermented Cabbage Casserole

I've had the perfect idea in my head for supper for a long, long time but it seemed impossible to get all of the pieces to fall into place at the same time during this busy season.  Just as I was giving up, my knight in blue denim armor finally swooped in to the rescue.  While the girls and I were off Christmas caroling tonight, my dear hubby put the final steps together to make one of his favorite dishes.

I wish it had some kind of swanky name, but we simply call it
Cabbage Casserole
  • 2 lbs of cabbage
  • 1/2 T sea salt (not optional)
  • 1/4 c whey drained from raw dairy
  • 2 c brown rice, uncooked
  • 2 additional t sea salt
  • 2 c tomato juice
  • 1 T or more fat
  • 2 onions
  • 2 cloves garlic
  • 1 lb. ground beef
  • 1/2 T fennel
  • 1/2 T black pepper
  • 1/8 c raw apple cidar vinegar
  • scant 3/4 c extra virgin olive oil
  • 1/2 T dijon mustard
  • 1 c buttermilk

1-7 days before dinner:
Remove the outer leaves and quarter a cabbage.  Remove the core.  Shred the cabbage into bite-sized pieces.  Sprinkle it with sea salt  (Just a note: if your salt isn't white it's unrefined, leaving you with lots of minerals to balance the sodium in your system.) and whey.

Allow the cabbage to sit at room temperature for 30 minutes.  The cabbage will start looking wet as the salt pulls the cabbage's juices to the surface.  Stir it up and allow it to sit for 30 more minutes before transfering it to a storage container.  (I like Mason jars, as is obvious to all who know me well.)  If the cabbage's juices do not cover the cabbage, pound it until it is covered.  (Heck, you can pound it even if the cabbage's juices do cover, just because there's nothing like a giving a cabbage a good pounding to release your own creative juices.  But, I digress.)  Allow to sit at room temperature for 24 hours for a mild flavor or 3-7 days for a sour flavor. 

(If you want to know why we're letting this sit, it's because we're culturing beneficial bacteria, in much the same way that yogurt is filled with beneficial bacteria.)

7-24 hours before dinner:
In a medium saucepan, combine rice, salt, and tomato juice.  Cover and leave at room temperature for 7-24 hours.

(For those who want to know why we're letting this sit)

40 minutes before dinner:
Bring the rice mixture to a boil.  Simmer for 25-35 minutes.  Allow to stand for 5 minutes to absorb most of the tomato.

Meanwhile saute the onions and garlic in the fat of your choice.  Add the beef and cook it until brown.  Stir in fennel and pepper.

Place the remaining ingredients in a 2-pint Mason jar.  Secure the lid and shake it well.  (Or, I suppose you could just stir them together in a little bowl, although that seems much more boring.)

In a casserole dish, layer the cabbage, rice, dressing, and meat mixture.  Place the casserole dish in a cool oven.  Turn on the oven to lowest setting--mine is 170 degrees.  Heat it until the casserole's temperature reaches just under 118 degrees--mine takes about 3 minutes.  That heats it up without destroying all of the enzymes.

I was so grateful to my dear hubby for following my directions and putting this dish together.  I failed to mention to him, however, that I had enough prepared enough cabbage for two meals so the pictures show a cabbage-heavy dish.  The family inhaled it, so the chances of me scrapping together enough leftovers for a second meal at this point are kind of slim.  Such is life.

With many thanks to the following who influenced this meal:
Lessons 2 & 14 of the Gnowfglin's Fundamentals e-course
Easy Layered Cabbage Casserole
Sausage a la Alton Brown
There's a 4th influence that I wish I could credit, but I lost the web address years ago.  It was for a delicious tomato soup.  I've pulled the recipe apart and put the ingredients back in a different order so you might not even recognize the original recipe anymore anyhow.

Shared with Living Well, Fight Back Friday, Freaky Friday, Monday Mania and Fat Tuesday.

Note (January 5, 2012):  It has come to my attention  that cabbage is a cruciferous vegetable and therefore should not be eaten raw.  Exceptions can be made for eating small amounts of sauerkraut as a condiment.  Since this recipe calls for a lot more than a few bites of raw cabbage, please, feel free to heat this at 350 degrees until it is heated through.  Thanks for the understanding.

Why Do We Soak Grains?

Putting a complicated matter into one paragraph
Grains, like all seeds, are designed by God to pass through the digestive process unscathed so that when... ahem... waste is left, the seeds will still be viable to cultivate new plants.  For the seeds protection, there are anti-nutrients and other compounds that hider digestion and the work of enzymes.  Soaking the grain mimics the sprouting process, which allows these anti-nutrients to be broken down--making the food more digestible.

Why Salt is not Optional in a Lacto-fermented Dish

Many of us over the years have avoided salt in an effort to stay heart-healthy.  When looking at lacto-fermented recipes it would be easy for us to omit the salt in order to make the dish more nutritious. 

But wait.  Salt is vital in lacto-fermented recipes. 

Most of you know that fish are classified as either salt-water fish or fresh-water fish.  Bacteria is similar.  Beneficial bacteria thrives when a little bit of salt is present.  However, with few exceptions, bacteria which causes food to spoil or bacteria which causes illness can't survive in a salty environment.

If the salt still makes you uncomfortable, you can add less salt when a starter culture is added, for example when adding whey from the culturing of raw dairy.  Don't omit it entirely, however.  Brine is a necessary preservative.

Don't go to the other extreme, however.  Too much of a good thing is too much.  Too much salt makes even the friendly bacteria struggle to reproduce.